Ubuntu Gnome 17.04をインストールして使用していますが、概ね良好です。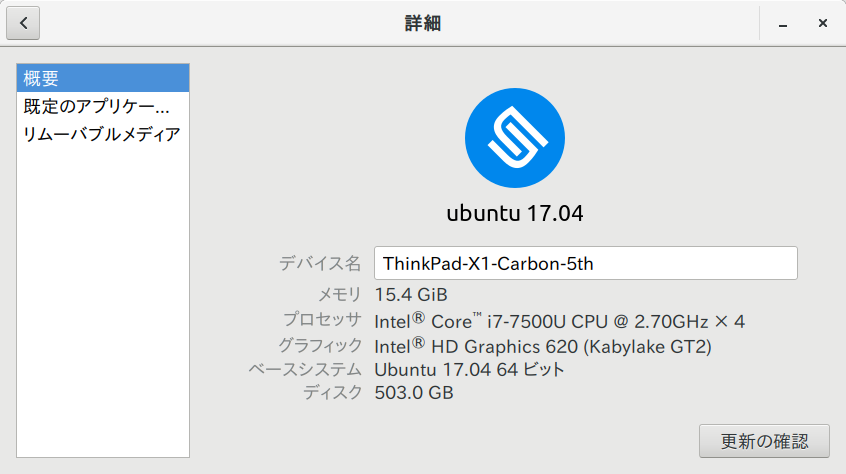
Ubuntu Gnomeをインストールして、ハードウェアについては、ほぼ問題なく使用できていることに驚いています。
現状では指紋センサーは全く使用できません。
Ubuntu Gnomeをインストール直後、CPUファンが回っていないことに気付き、調べてみると歴代ThinkPadシリーズが抱える問題であることが分かりました。
とりあえず、いろいろなサイトで勉強させていただいて、CPUファン制御ができるようになったのでメモ書きとして残しておきたいと思います。
CPUファンを温度センサーに応じて回転させる。
いろいろ調べてみた結果、次のことが分かりました。
- Thinkpadにはファン制御のためのモジュール「thinkpad-acpi」がkernelに組み込まれている
- ただし、安全上の理由で、これが無効にされている。
- これを有効にするには、fan_contorol=1というパラメータを指定すればいい。
- kernelモジュールだけだと、温度変化に対応したファン回転数を決められない
- そこで、thinkfanデーモンをインストールして、監視させる。
- ただし、温度の計測結果を保存する場所がないので、lm-sensorsをインストールしないといけない。
ということなので一つ一つ潰していきます。
thinkpad-acpiのファンコントロールを有効にする
まずはCPUファンコントロールが有効になるかを見てみます。
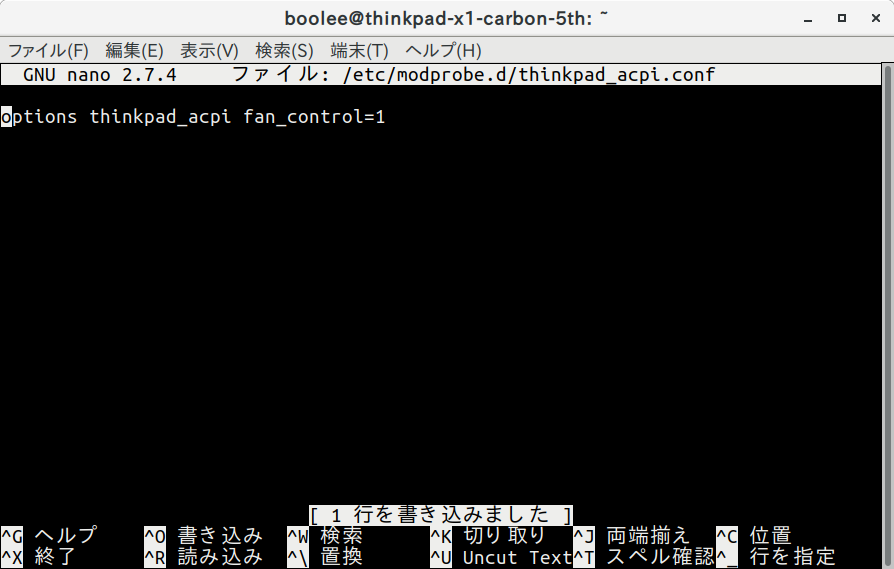
「thinkpad_acpi.conf」を作成して、一文追記です。
$ sudo nano /etc/modprobe.d/thinkpad_acpi.conf
options thinkpad_acpi fan_control=1
再起動。
SU権限でこれらのコマンドを唱えてみて(どれでもいいです)、ファンスピードを変えられたら、とりあえず制御はできています。
# echo level 0 | sudo tee /proc/acpi/ibm/fan (ファン停止)
# echo level 2 | sudo tee /proc/acpi/ibm/fan (低速)
# echo level 4 | sudo tee /proc/acpi/ibm/fan (中速)
# echo level 7 | sudo tee /proc/acpi/ibm/fan (高速)
# echo level auto | sudo tee /proc/acpi/ibm/fan (自動)
# echo level disengaged | sudo tee /proc/acpi/ibm/fan (最強)
また、ファンの状態を見たければ、なんか答えてくれます。
$ cat /proc/acpi/ibm/fan
status: disabled
speed: 0
level: 0
commands: level <level> (<level> is 0-7, auto, disengaged, full-speed)
commands: enable, disable
commands: watchdog <timeout> (<timeout> is 0 (off), 1-120 (seconds))
ファンの回転数を温度に合わせて変更する。
thinkfanというデーモンを起動させて、監視させる。
$ sudo apt install thinkfan
これだけだと温度センサーを読みに行かないので、マザーボード上の温度センサーから温度を取得するプログラムをインストールします。
$ sudo apt install lm_sensors
インストール後、センサーを自動的に取得してみます。
基本的にはすべて、エンターキーを押して、最後に設定を書き込むところだけ、Yesとすればオッケーです。
$ sudo sensors-detect

# sensors-detect revision 6284 (2015-05-31 14:00:33 +0200)
# System: LENOVO 20HRCTO1WW [ThinkPad X1 Carbon 5th] (laptop)
# Kernel: 4.10.0-28-generic x86_64
# Processor: Intel(R) Core(TM) i7-7500U CPU @ 2.70GHz (6/142/9)

This program will help you determine which kernel modules you need
to load to use lm_sensors most effectively. It is generally safe
and recommended to accept the default answers to all questions,
unless you know what you're doing.

Some south bridges, CPUs or memory controllers contain embedded sensors.
Do you want to scan for them? This is totally safe. (YES/no): Enter
Module cpuid loaded successfully.
Silicon Integrated Systems SIS5595... No
VIA VT82C686 Integrated Sensors... No
VIA VT8231 Integrated Sensors... No
AMD K8 thermal sensors... No
AMD Family 10h thermal sensors... No
AMD Family 11h thermal sensors... No
AMD Family 12h and 14h thermal sensors... No
AMD Family 15h thermal sensors... No
AMD Family 16h thermal sensors... No
AMD Family 15h power sensors... No
AMD Family 16h power sensors... No
Intel digital thermal sensor... Success!
 (driver `coretemp')
Intel AMB FB-DIMM thermal sensor... No
Intel 5500/5520/X58 thermal sensor... No
VIA C7 thermal sensor... No
VIA Nano thermal sensor... No

Some Super I/O chips contain embedded sensors. We have to write to
standard I/O ports to probe them. This is usually safe.
Do you want to scan for Super I/O sensors? (YES/no):Enter
Probing for Super-I/O at 0x2e/0x2f
Trying family `National Semiconductor/ITE'... No
Trying family `SMSC'... No
Trying family `VIA/Winbond/Nuvoton/Fintek'... No
Trying family `ITE'... No
Probing for Super-I/O at 0x4e/0x4f
Trying family `National Semiconductor/ITE'... No
Trying family `SMSC'... Yes
Found unknown chip with ID 0x2901

Some hardware monitoring chips are accessible through the ISA I/O ports.
We have to write to arbitrary I/O ports to probe them. This is usually
safe though. Yes, you do have ISA I/O ports even if you do not have any
ISA slots! Do you want to scan the ISA I/O ports? (YES/no):
Probing for `National Semiconductor LM78' at 0x290... No
Probing for `National Semiconductor LM79' at 0x290... No
Probing for `Winbond W83781D' at 0x290... No
Probing for `Winbond W83782D' at 0x290... No

Lastly, we can probe the I2C/SMBus adapters for connected hardware
monitoring devices. This is the most risky part, and while it works
reasonably well on most systems, it has been reported to cause trouble
on some systems.
Do you want to probe the I2C/SMBus adapters now? (YES/no):Enter
Found unknown SMBus adapter 8086:9d23 at 0000:00:1f.4.
Sorry, no supported PCI bus adapters found.

Next adapter: i915 gmbus dpc (i2c-0)
Do you want to scan it? (yes/NO/selectively):

Next adapter: i915 gmbus dpb (i2c-1)
Do you want to scan it? (yes/NO/selectively):

Next adapter: i915 gmbus dpd (i2c-2)
Do you want to scan it? (yes/NO/selectively):

Next adapter: DPDDC-A (i2c-3)
Do you want to scan it? (yes/NO/selectively):

Next adapter: DPDDC-B (i2c-4)
Do you want to scan it? (yes/NO/selectively):

Next adapter: DPDDC-C (i2c-5)
Do you want to scan it? (yes/NO/selectively):


Now follows a summary of the probes I have just done.
Just press ENTER to continue:

Driver `coretemp':
 * Chip `Intel digital thermal sensor' (confidence: 9)

To load everything that is needed, add this to /etc/modules:
#----cut here----
# Chip drivers
coretemp
#----cut here----
If you have some drivers built into your kernel, the list above will
contain too many modules. Skip the appropriate ones!

Do you want to add these lines automatically to /etc/modules? (yes/NO)yes
Successful!

Monitoring programs won't work until the needed modules are
loaded. You may want to run '/etc/init.d/kmod start'
to load them.

Unloading cpuid... OK
設定が書き込まれたかを確認してみます。
「coretemp」が書いてあればオッケーです。
$ cat /etc/modules
# /etc/modules: kernel modules to load at boot time.
#
# This file contains the names of kernel modules that should be loaded
# at boot time, one per line. Lines beginning with "#" are ignored.

# Generated by sensors-detect on Sun Jul 30 00:48:23 2017
# Chip drivers
coretemp
試しにセンサーで数値が読み取れているかを確認してみます。
$ sensors
iwlwifi-virtual-0
Adapter: Virtual device
temp1: +29.0°C

pch_skylake-virtual-0
Adapter: Virtual device
temp1: +31.0°C

acpitz-virtual-0
Adapter: Virtual device
temp1: +48.0°C (crit = +128.0°C)

thinkpad-isa-0000
Adapter: ISA adapter
fan1: 4089 RPM

coretemp-isa-0000
Adapter: ISA adapter
Package id 0: +32.0°C (high = +100.0°C, crit = +100.0°C)
Core 0: +28.0°C (high = +100.0°C, crit = +100.0°C)
Core 1: +29.0°C (high = +100.0°C, crit = +100.0°C)
・・・多分、大丈夫。
次に温度センサーで取得された測定値がどこに書き込まれたかを探してみます。
$ sudo find /sys/devices -type f -name "temp*_input"
/sys/devices/platform/coretemp.0/hwmon/hwmon1/temp2_input
/sys/devices/platform/coretemp.0/hwmon/hwmon1/temp3_input
/sys/devices/platform/coretemp.0/hwmon/hwmon1/temp1_input
/sys/devices/virtual/hwmon/hwmon4/temp1_input
/sys/devices/virtual/hwmon/hwmon2/temp1_input
/sys/devices/virtual/hwmon/hwmon0/temp1_input
6種類ほど出てきました。
ここで得られたものをコピペしてthinkfanの設定ファイルに書き込むだけです。
基本的には前項の「/sys/devices〜」の前に「sensor」とか「hwmon」などをつけてコピペすればいいのですが、試行錯誤した結果、次のようになりました。
自分の場合、「sensor」だと「hwmonとか他のを試してね」的なエラーが出てしまいました。
$ sudo nano /etc/thinkfan.conf$ sudo nano /etc/thinkfan.conf

# I use this on my T61p:
#tp_fan /proc/acpi/ibm/fan#tp_thermal /proc/acpi/ibm/thermal (0, 10, 15, 2, 10, 5, 0, 3, 0, 3)

#MY ThinkPad X1 Carbon 5th
#↓これを追記
tp_fan /proc/acpi/ibm/fan
hwmon /sys/devices/platform/coretemp.0/
hwmon/hwmon1/temp2_input
hwmon /sys/devices/platform/coretemp.0/
hwmon/hwmon1/temp3_input
hwmon /sys/devices/platform/coretemp.0/
hwmon/hwmon1/temp1_input
#↓これはコメントアウトして除外
#hwmon /sys/devices/virtual/hwmon/hwmon4/temp1_input
hwmon /sys/devices/virtual/hwmon/hwmon0/temp1_input
hwmon /sys/devices/virtual/hwmon/hwmon2/temp1_input


#ファンレベル、最低温度、最高温度
#温度はオーバーラップさせる
#↓これを追記
(0,     0,      55)
(1,     48,     60)
(2,     50,     61)
(3,     52,     63)
(4,     56,     65)
(5,     59,     66)
(7,     63,     32767)
thinkfanデーモンを有効にする
thinkfanデーモンを有効にしてみます。
まず手動で実行できるか試してみますが、別にやらなくてもいいかもしれません。
$ sudo thinkfan -n
PCに負荷のかかるようなことをしてみて、CPUファンがうなればオッケーだと思います。
daemonとして登録する。
自動的に監視してもらわないと困るので、登録します。
$ sudo systemctl enable thinkfan
Synchronizing state of thinkfan.service with SysV service script with /lib/systemd/systemd-sysv-install.
Executing: /lib/systemd/systemd-sysv-install enable thinkfan
動いているか確かめてみる。
$ sudo systemctl status thinkfan

 thinkfan.service - simple and lightweight fan control program
Loaded: loaded (/lib/systemd/system/thinkfan.service; enabled; vendor preset:
Active: active (running) since Sun 2017-08-06 14:36:51 JST; 1min 26s ago
Main PID: 22340 (thinkfan)
CGroup: /system.slice/thinkfan.service
          └─22340 /usr/sbin/thinkfan

8月 06 14:36:51 thinkpad-x1-carbon-5th systemd[1]: Starting simple and lightweig
8月 06 14:36:51 thinkpad-x1-carbon-5th thinkfan[22339]: thinkfan 0.9.1 starting
8月 06 14:36:51 thinkpad-x1-carbon-5th thinkfan[22339]: WARNING: You're using s
8月 06 14:36:51 thinkpad-x1-carbon-5th thinkfan[22339]: Daemon PID: 22340
8月 06 14:36:51 thinkpad-x1-carbon-5th systemd[1]: Started simple and lightweig
もし、エラーが出ていればdaemonは起動しないし、「active」のところが「inactive」と表示さます。
原因はさまざまあると思いますが、虱潰しに問題を解決していく他ありませんでした。
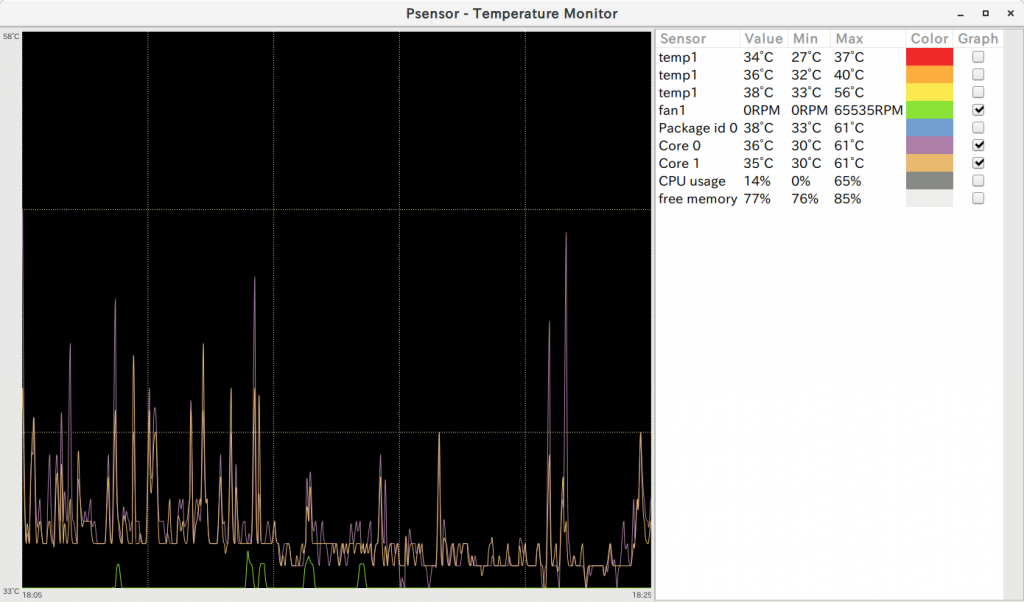
CPUが高温になる時はありますが、時々、CPUファンが回る程度まで落ち着きました。
久しぶりのThinkPadの出来の良さに、すっかり惚れ込んでいます。


コメント